The Tesla Dashcam and the sentry mode requires a USB device to store the videos. Only USB devices with the file system FAT32 (Windows) or ext4 (Linux) format can be used in a Tesla. Most devices up to 32 GB size have already been formatted with FAT32 by the manufacturer. However, larger flash drives are often sold with NTFS format. Such devices must be reformatted on the PC/Mac to use them in the vehicle. Formatting deletes all data on the device.
Important: Only Tesla vehicles with at least Autopilot Hardware 2.5 can store videos on the USB device. The sentry mode also works with AP2.0, but the videos cannot be saved. Dashcam is not possible with AP2.0, you need to either upgrade the Autopilot Hardware or get an external Dashcam. More details in the overview of the autopilot differences.
Formatting the USB device in the car
Since some time, Tesla also offers the possibility to format a USB device directly in the car. Simply plug the pen drive/SSD/MicroSD, etc. into one of the front USB ports. Then select in the car settings under “Security” > “Format USB device”. ATTENTION: All data on the USB device will be deleted by formatting! The device will then be formatted as exFAT file system and the folder TeslaCam will be created automatically.
Important: The button for formatting is always grayed out if your Tesla sees more than 1 partition. So, if maybe 2 sticks are connected, or 1 stick with 2 partitions.
Some larger Devices can’t be formatted in the car. You need to format them on a PC or Mac. Just follow these guidelines:
Format the USB device for the Tesla (Windows PC)
The Windows Explorer under Windows 10 can unfortunately only format USB devices with a maximum size of 32 GB. But with third-party tools, larger devices can also be formatted with FAT32. One such free tool is Rufus. The following instructions explain how to format a USB device on a Windows computer with Rufus.
IMPORTANT: All data on the USB device will be deleted during formatting!
- Download Rufus. The “portable version” is sufficient. It has the advantage that it does not need to be installed on the PC. You can start it directly from the EXE file with a double click.
- Start Rufus with a double click and select the following settings:
1. Select your USB Device under “Device”. Important: make sure that you have selected the correct device!
2. Under “Boot Selection” select the option “Non-bootable”.
3. For “File system” choose “FAT32 (default)”.
4. For “Cluster size” select the option with the label (default).
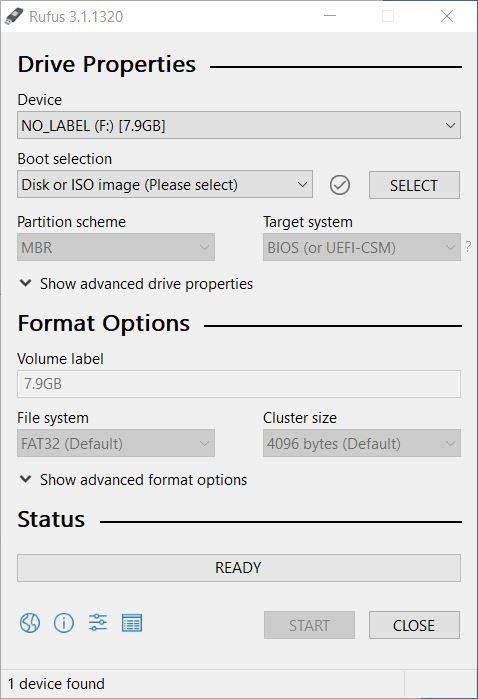
5. Click on “START” to delete the USB device and format it with FAT32.
6. After successful formatting, click on “CLOSE”.
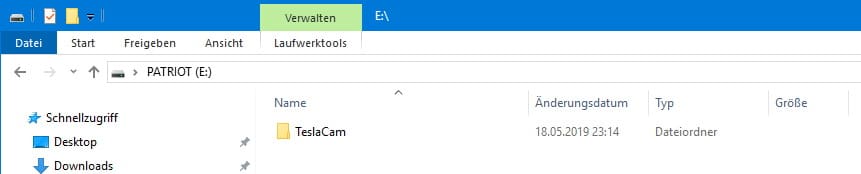
7. An empty folder named TeslaCam must then be created on the device:
8. After plugging the device into the car’s USB Port, the Dashcam logo with a red dot should appear in the upper-right corner of the screen:

The red dot means the Tesla is currently recording a video and storing it on the USB device.

All Weather Floor Mat. Front, Rear, Cargo Liner Mat. Waterproof, Anti-Slip and Custom Fit.
Shop for more Tesla Accessories here!
Format the USB device for the Tesla (Mac)
Mac users do not need to use any special tools to format the device. Simply delete the device with the disk utility, selecting the MS-DOS (FAT) setting. You can also name the device with an appropriate name. Then create the TeslaCam folder on the newly formatted USB device. Done.
Problem troubleshooting
The Dashcam icon with the red dot does not appear
This problem occurs if the USB device is not recognized by the vehicle. The device must be formatted in either FAT32 or ext4 file system. This problem also occurs if the TeslaCam folder was not created. A USB hub or an extension cable between the device and the USB port can also be the cause. In case of doubt, plug the device directly into the port to test if it works like this.
Some users report on the Internet that with the “Cluster size” setting of “4096 bytes”, they also made USB device working that did not work with another setting.
Other users report that for them, the Dashcam only worked with a folder named “Teslacam” without a capital C.
Sometimes it is also reported that certain devices only work on one USB port. So in this case you should try all front USB ports of the Tesla.
The Rufus Tool seems to format the devices differently than the Windows 10 Explorer. If you have formatted a device with Windows unsuccessfully, you should still try Rufus. It is reported on Facebook Groups that these devices worked after formatting with Rufus.
Videos sometimes contain image interference
The writing speed of the USB device is too slow, and the vehicle cannot write the large amount of data to the device fast enough. The USB device should comply with the USB3 standard and have a sufficiently high writing speed capabilities. The following devices should work according to the experience of Tesla drivers.
Videos are no longer recorded
Possibly, the USB device is full. The data on the Dashcam will be automatically overwritten after one hour. Manually stored Dashcam sequences and sentry mode videos are automatically deleted with Tesla software version V10 or higher. Please check the fill level of the device on a PC or Mac. If a device is full, it is no longer usable until free space is created again manually. Some full devices even need to be reformatted to make them reusable.
The USB device suddenly no longer works in your Tesla
If the device is removed from the USB port without stopping video recording, the file system on the device may be damaged. In the best case, the device just needs to be reformatted to make it work again. In the worst case, the device may even be permanently damaged.
To prevent damage, the video recording can be stopped by pressing and holding the Dashcam icon (the icon turns gray when recording is stopped). The device should not be removed from the port until the red dot on the symbol has gone away.